Thursday, September 27, 2012

Halloween Wreath


While wandering the isles of Michael's today I found some very cute glitter spiders! I fell in love instantly despite my persistent arachnophobia. I had already been looking for ideas for a wreath so they were perfect. Conveniently, they had little clothes pins attached to them. Perfect!


I used my old wreath made out of grape vines. I spray painted it black (used almost a whole can to cover it all) and then attached my fabulous spider friends. Then I added a bow (of course) to top it off. 

Happy Fall :}

Saturday, June 16, 2012

Paris Card


I made this card for a bridal shower this summer. The bride spent the last several months teaching English in France. She loved it. So I made a best wishes card for her with a Paris theme. Turned out pretty cute!


Saturday, June 9, 2012

Father's Day Card


I really wanted to make a father's day card that was different than other cards I had seen. I had this wood cardstock so I thought i would try to make the card look like wood nailed together. I cut up the wood paper to look like 2x4 planks. Then i used brads to look like nails. I bet I could have even found brads that looked like nail heads if I tried. But these worked fine. Then i made a sign and slapped it right on the front.


Thursday, May 31, 2012

Mother's Day Card


I am finally showing you my Mother's Day Card! It turned out pretty cute. My mom liked it! I bought a cheap jar of buttons from Goodwill and a bunch of butterfly punches from Joann's. I really love using buttons!


I have made my Father's Day Card too so keep an eye out!


Thursday, May 17, 2012

Hourglass Footwear

Hand painted shoes for smart women!
A fashion project in Seattle, WA.


These shoes are painted by some seriously talented artists. They are fundraising right now to kick-start their company. Take a look at their fundraising site and watch their promotional video.


So great!

Tuesday, April 10, 2012

Easter Bark


Happy (late) Easter! I know it has been a while since I last posted, but some new and exciting things have happened and I got caught up in it all. My new job has been taking up a lot of time and then some family came up for Easter! Anyway, I wanted to share my Easter Bark recipe with you because it is so delicious!

Ingredients:
  • 1 bar of dark chocolate
  • 1 bar of white chocolate
  • M&Ms
  • Pretzels 
  • Thin Mint Cookies (or any cookie of your choice - substitute if you dislike mint)
  • Parchment Paper
  • Cookie Sheet
First smash up ingredients (cookies/pretzels) until they are manageable sizes.


Then melt the chocolate. I used the microwave, but do so cautiously. It is easy to burn the chocolate because of the high heat. Heat it with 10-30 second intervals and stir really well. When it is melted pour it out on some parchment paper on a cookie sheet. Smooth out and cover with toppings.


Let cool/harden. I put mine in the fridge. Yum!

* Special thanks to my brother for the help! Love you!


Monday, March 19, 2012

No Slip Socks


Making your own no-slip socks is really easy. I saw the idea on this blog on Pinterest. I had to go find the original blog (ug) but the tutorial is really cute since it is for kids. 
The only hard part is coming up with a design.

Ingredients:
  • Socks
  • Fabric Paint (way easier if you get it in the tubes with the handy tips)
Forgive me: I used old socks for this project. Lay out your socks so the bottom is up. 


 I like to have a piece of paper next to me so I can try out a design there first. Plus then if the paint is not mixed well, you do not get a gooey mess on your socks. When your ready paint on your socks! Make sure to put it on thick because it will shrink as it dries. Make sure to let it dry for at least 4 hours before wearing. I would even leave it overnight if possible.


This would be especially helpful in a house with hardwood floors. Kids are so clumsy. Well, so am I ... but not anymore!

Thursday, March 8, 2012

Shamrock Ring


I saw the cutest felt shamrock on Pinterest the other day and I knew I had to do something with the idea. I could not figure out the original source, but here is the link to my Pinterest board so you can see the original idea.

Ingredients:
  • Green Felt
  • Small Scissors
  • Needle & Thread
  • Ring
First I made a pattern. I always make patterns or I will probably end up messing it up and wasting material.


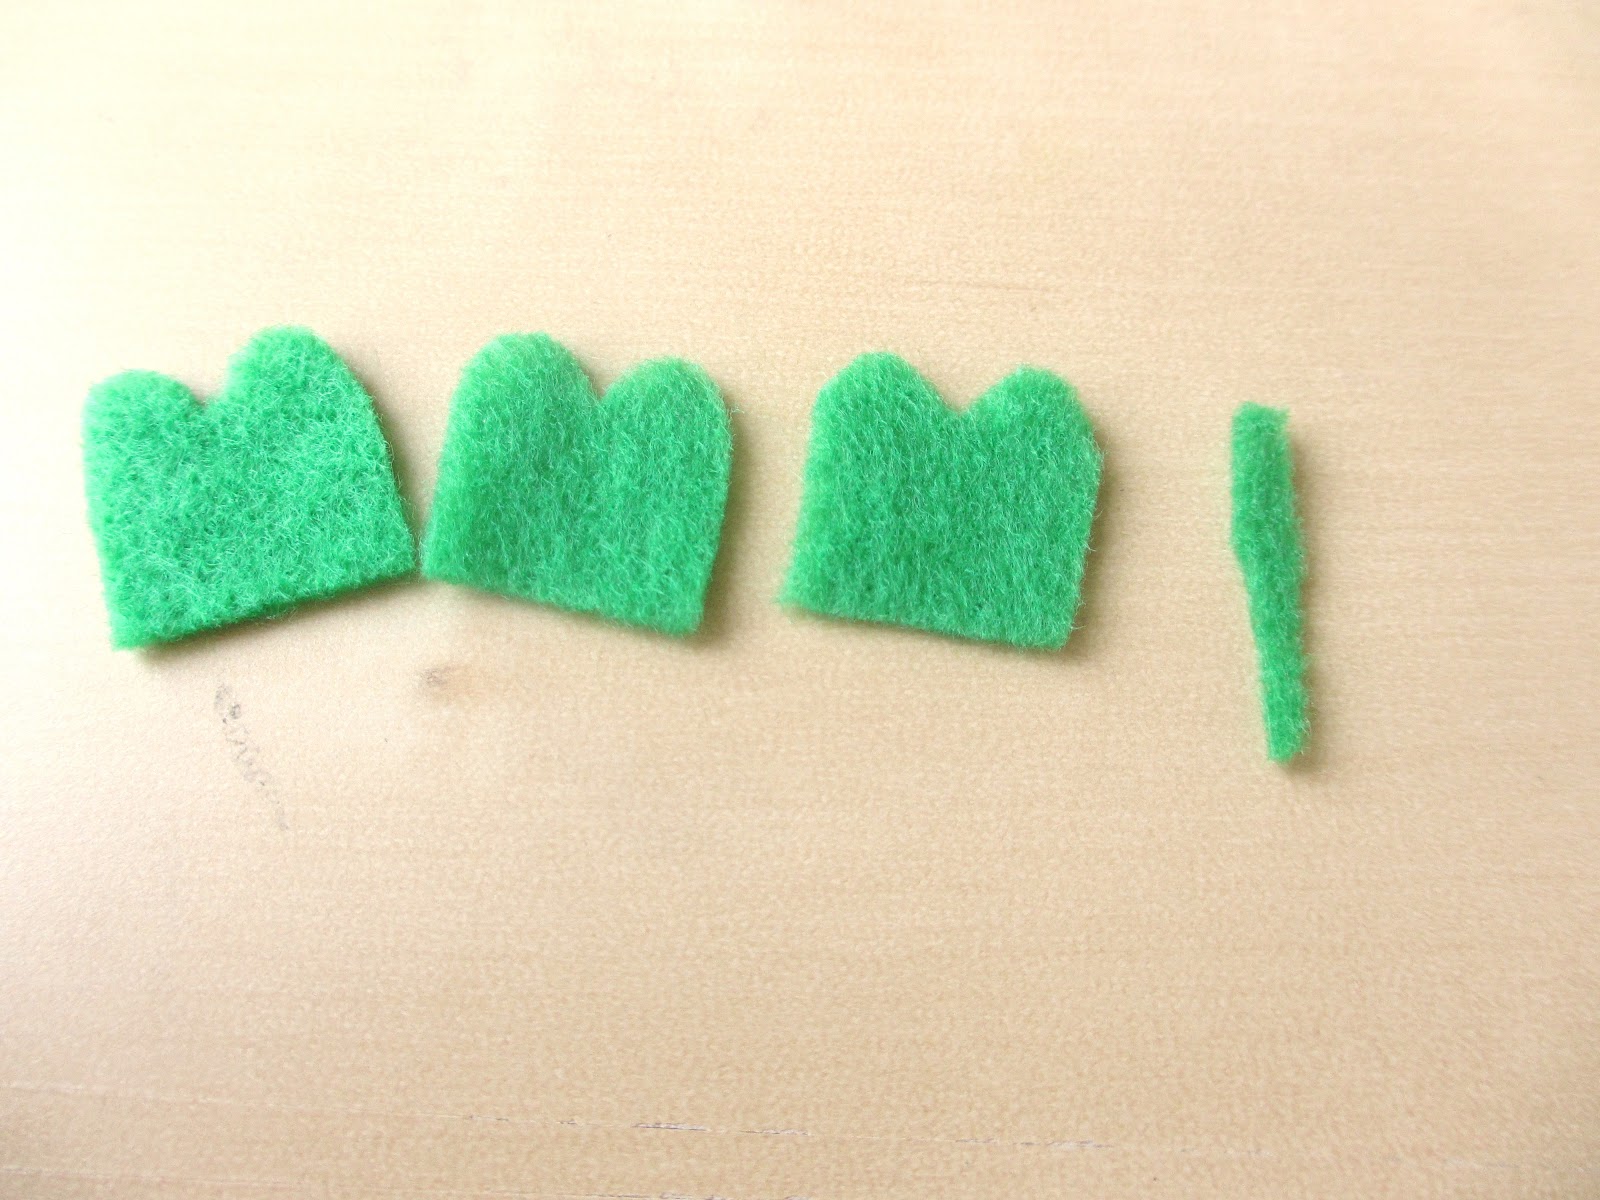
 I used this pattern to cut out 3 leaves. you can cut out 4 if you want a special shamrock. I also used a bit of scrap to make a stem. 


With thread I used a couple stitches to connect everything. 


Disconnect the needle and pull both ends toward each other. At the same time adjust the felt so it folds in the right places. And you make ....


A pretty shamrock! At this point you just tie it off and you are done. You could attach this to a hairpin or headband if you want. I decided to make it into a ring.

With more thread I just randomly sewed the shamrock on an old ring. I really liked having a ring with a space open so I could really make it secure.


After this you could add some glue or something to make it super secure, but I didn't. Too much bother for me. I hope you like it! Simple, cute, and cheap. Felt was about 30 cents for a sheet and the ring was recycled!


Monday, March 5, 2012

Paper Shamrock


I am really enjoying making St. Patrick's Day decorations this year! I came up with this one while babysitting this adorable girl who is obsessed with making paper snowflakes (even though it's March). I decided to try something different and poof, I made a shamrock! 

Ingredients:
  • Paper
  • Scissors
  • Pencil
First make a square with your paper. If you were ever a child you should know how to do this :)


Now fold the square in half again, point to point.


I like to have an outline before I cut, or I mess it up big time. So if you are like me, go ahead and draw a heart in the bottom corner. Make sure to have the sides of the heart go low down. However, make sure the heart is still connected and the bottom (the center of the shamrock). In the picture below the heart sides do not go down enough. I actually cut it further later.


Cut and enjoy!


 The picture above is how deep I cut the sides of the heart. If you do not cut so far down your shamrock will not have the indents shown below.


The best part of this craft is that it costs almost nothing and you can make so many things with it. String a bunch together to make a garland or frame a couple for a cute St. Patties decoration. Make a ton and get ready for St. Patrick's Day!

Sunday, March 4, 2012

St. Patties Day Card


Being Irish, I wanted to celebrate this holiday with a fun, easy card. I found these cute glittery button stickers at Michael's in the sale isle. They are so cute! I wish my camera could capture the glittery-ness, but I am camera deficient. 


I decided to use velum on this card too. I always forget about velum, but it can really give a card a cute accent. The only thing I did not like was that the velum got a bit wavy when I used the embossing gun on it. 

The ribbon actually has a four leaf clover pattern on the other side, but I did not really like it so I flipped it over and thought it looked pretty cute with the stitching. 

All in all this card probably took me 10 minutes to make. Easy!

Saturday, March 3, 2012

The New and the Old

I know it has been a while since my last post. Lots of changes happening for me in the past week! I received a job offer (finally) and I am going to start work in a week! This job is on the coast so I will be commuting from here to there once a week. Because of this, I bought a new car!


I am so in love with my Ford Focus! I did not know I could love a car this much. I did love my old car (Wendy), but it was a love/hate relationship that revolved around a broken transmission that I could not afford to fix. I had so many good times in that car though so I will take a few minutes to talk about the good times:
  • I was gifted Wendy senior year of high school after I turned 18 and got my license. I was then able to create my own schedule (within limits) and drive myself around to visit friends.
  • I went on a long weekend trip to Monterrey with my girl friends and my first foster kittens in tow. Very memorable. 
  • Wendy drove me home to California every break during college so I could visit family and friends who I DEARLY missed. The drive was long, but with a Monster drink and some good music it was actually really fun.
  • During college my stress reliever was to do a late night drive to Michael's and Target.
  •  Wendy carried so many foster animals to and from the Humane Society. Her passenger seat was just big enough so I could put the carrier sideways and talk to the animals while I drove (it keeps them calm).
  • Driving Wendy in her last months was difficult, but also a bit exciting. I never knew if I was going to make it. On hills I could not go over 45 mph which was difficult on the freeway :) When her radiator blew it was a crazy experience driving home and stopping every couple minutes to let it cool down. Learning to drive an automatic like a manual was fun, but I won't miss it.
I won't miss the difficulties that came with an old car, but she will always be my first :)

Now I have a new job, a new car, and a new outlook on life! Thanks for reading. I will be posting my St. Patties Card tomorrow so stay tuned!

Friday, February 24, 2012

St. Patties Bacon & Eggs


Green Eggs & Ham! Oh Dr. Seuss, you have changed the world. I have seen these all over the place so I knew I had to try this for St. Patrick's Day. What could be better than chocolate and pretzels? Not much. 

Ingredients:
  • Pretzel Sticks - you can also use the square pretzels and have eggs on toast :)
  • M&Ms - green (although you could use any color you want)
  • White Candy Melts - found at Michael's
  • Parchment Paper

 First line a couple baking sheets with parchment paper. This is not absolutely necessary, but good to use in case the candy melts too much into a gooey mess. Preheat the oven to 350.


Then put down the pretzel sticks in twos.


On each pair put a candy melt.


Put them in the oven for literally a minute. You just want them to melt, but not fall apart. 
When they are melted take them out and place a green M&M on each egg. Press gently or you will squish it!


YUM! These are absolutely addicting!