Monday, November 28, 2011

Holiday Rolls


Bread is one of my many weaknesses. There is nothing as good as a warm, fluffy, roll when it gets cold outside. Plus bread goes with practically anything. My boyfriends mom found this recipe and it turned out amazing. Specifically they are called "Bowknot Rolls" because you tie them in knots!


Ingredients:
  • 7.5 - 8 cups all-purpose flour
  • 1/2 cup sugar
  • 4 tsp salt
  • 2 packets of rapid rise yeast
  • 1.5 cups milk
  • 1.5 cups water
  • .5 butter (one stick)
  • 2 eggs
I do not have pictures of the first couple steps because I got too caught up in the cooking and forgot - sorry! But I promise you the recipe is really easy.
Mix 3 cups of flour, the sugar, salt and yeast in a bowl. I put it in my kitchenaid mixer bowl since you are going to be mixing it a lot. Then heat milk, water, and butter. I used a saucepan and heated it until it was warm but not too hot to the touch. You do not want to hurt the yeast. Then add the wet mixture to the dry mixture and mix in the two eggs. Beat on medium speed for 2 minutes. Then start adding flour in increments to form a soft dough.


Then put your dough on a floured surface and knead for 6-8 minutes. I found the dough to be really sticky so I added more flour as needed.


Then cover the dough and let it rest for 10 minutes.
Next separate the dough into 3 mounds. Roll each mound out and cut 1" strips.


Tie each strip into a knot (like a pretzel) and lay it on a greased baking sheet.


For longer strips I knotted them twice. They look too funny with long tails.


I actually really like the big ones. They look really pretty after they are cooked. Now cover the rolls and let them rest for around 45 minutes. The recipe says they are supposed to double in size but my dough barely rose at all. I am not sure why. But they turned out delicious anyway. 
The recipe gives some complex instructions on how to cook, freeze, and then cook them again, but I ignored that. I baked them at 350 until they were a golden brown. It took about 7-10 minutes. Yum!


Sunday, November 20, 2011

Las Caletas Coconut Snack


When in Mexico I went to this private beach called Las Caletas. Vallarta Adventures owns this land so you have to pay to get there. It is considered an excursion because you can dive, snorkel, and hike. While I was there a man was selling coconuts to eat. It was the most amazing and simple recipe. However, you need to have access to a coconut and a machete. Good luck.

Ingredients:
  • Coconut
  • Lime
  • Chile Powder
  • Salt
  • Machete or some other method of cutting open the coconut
 First cut open the coconut with your machete.


Then carve out the coconut and cut the meat into small pieces.


Put the coconut meat back into the husk shell and add lime juice, salt, and chile powder. Just add a couple shakes each of the salt and chile powder. Then eat!


*My coconut is pink because it was first a drink called Loco Coco :)

23rd Birthday


I don't usually talk primarily about people on my blog, but I had to give some kudos to my boyfriend and my friends for making my birthday awesome. I did not have much planned for my 23rd since it is not really a ground breaking age. But, I was given ice cream (see above picture) with candles. My awesome boyfriend knows just what I like <3.
Then my girls took me out to get food and they sang happy birthday to me!


Sometimes it is hard to remember how lucky I am to have so much love in my life. I am glad I got a reminder! Love you guys!

Wednesday, November 16, 2011

Souvenir Sand in a Bottle


My boyfriend and I just spent two weeks in Puerto Vallarta, Mexico and it was so amazing! I cannot describe how life changing the sun is when you live in a constant rain cloud. Anyway, I brought back sand so I could start a collection of vacation sands. I guess it won't work if we go someplace without a beach, but I will figure that out later. 
Ingredients:
  • Sand
  • Clear Bottles (with tops)
  • Velum (the kinda see-through paper)
  • Sticker Making Machine (I use xyron)
First I filled the bottles up with sand. It turned out I brought way too much sand home! I wish I had known; I could have saved pounds in my luggage. 
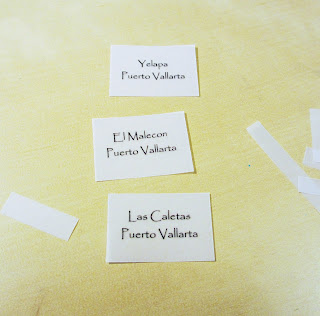
Making the labels is the longest part. First type out what you want the label to say.


Then print it out on the velum paper and cut it to size. Notice how you can see through the paper a bit?


Then use your sticker-maker to turn your labels into stickers.


Stick your sticker onto the bottle.


Now your done! Easy and cute! I hope I am able to expand my collection :)


Tuesday, November 8, 2011

Dyed T-Shirt


When I was younger I used to work for my grandmother in the summers. She made Shibori scarves and sold them as a business. It was at times hard work, but mostly it was fun and creative. This was a while ago so it was fun to do some dying today. I found that you can buy single servings of dye to use. This was really fun!
Ingredients:
  • Rit Dye - I think it was only a couple bucks. I used royal blue.
  • Hot Water
  • Gloves
  • Timer - a kitchen timer works awesome
  • T-shirt - $5 at Michael's
I used the hottest water I could and mixed it with the package of dye. I used a medium sized metal bowl and put enough water in to completely cover the t-shirt when submerged. Mix mix mix. 


Bubbly!
Now here is the part that is the longest, depending on how dark you want the dye. The longer the fabric stays in the dye, the darker it gets. I decided to have the bottom of my shirt be darker so I submerged the shirt in 10 minute increments until it was fully submerged.


This took about an hour. Then I brought everything to the sink and rinsed out the t-shirt with hot water. I decreased the temperature as the dye washed out. 


I scrunched my t-shirt into a tube when I dyed it so it came out a bit splotchy. At first I was upset, but I actually really like it now. After the water ran clear I threw the t-shirt into the dryer so I could put it on right away.


It's like an ombre/tye dye shirt. Pretty cool for such a cheap project.

Saturday, November 5, 2011

Feather Hair clip


Since I have been having so much fun with feathers I thought I would make yet another hair doodad. 


Ingredients:
  • Feathers
  • Hot Glue Gun
  • Hair clip
 This is a very easy craft and requires no experience or expertise. You pretty much just put glue on the clip and then add the feathers in whatever pattern you want.


I guess first you have to pick out your feathers. There are so many to choose from!


Simple, but cute!