Monday, January 30, 2012

Foster Kitten Fun

 Look at one of my cute foster kittens! Her name is Verbena and she is a doll! In this picture she is in a bag being tickled.


If you have not found your furry soul mate head down to your local shelter and adopt one of the cute animals up for adoption. If you are not ready for adoption but want someone to cuddle with, try being a foster parent. It is rewarding and gives a second chance to many animals who would otherwise be abandoned. If you have any questions leave me a message below!

Sunday, January 29, 2012

Valentine's Day Cards

I had a couple of ideas for Valentine's Day so I made them all! I tried using different textiles to make the cards interesting. Here is the first and simplest one:


Ingredients:
  • White Paper
  • Red Felt
  • White Thread & Needle
  • Heart Shape (for a cut-out)
  • Red Pen
I took a blank white card and cut out a heart shape. Then I put the felt behind the cut out and taped it down. Next take a needle and thread and stitch a ... stitch on the heart. On the inside write a message:


To finish it off cover the inside felt with white paper so it looks finished. Cute!

The next one uses felt and burlap to make an interesting blend.

Ingredients:
  • Background Paper & White Paper (background)
  • Burlap
  • Red Felt
  • White Thread & Needle

I cut a heart out of the red felt and stitched it to some burlap. Then i cut the burlap to fit around the heart. I cut a patterned piece of paper a bit smaller than the card and glued it on the white background. Then I attached the heart to the background. All done!
The last one has way too many steps so I won't lecture you. The colors look a bit off in the pictures but it looks really good in person. 


The realistic heart might make it look a bit creepy, but for us medical peeps it is pretty cool ... well at least I love it.


Tell me what you think :)

Sunday, January 22, 2012

Go 49ers!


Support the 49ers today! 

Ingredients:
  • Gold, Red and White Nail Polish (I used a white striper)
  • Clear Top Coat
First put down a gold base.


Next carefully make a red tip.


Make a white stripe to separate the gold and red.


To make this design extra special add the SF logo.

All done and ready to root for the SF team!

Saturday, January 21, 2012

Spring Wreath


I was going to make a wreath for winter, but that did not quite happen. As most crafting goes, it's better to follow your instincts even if you veer away from your original idea. This was definitely that type of project. I wanted something dark and dreary like the weather, but then I found this bright, happy, yellow and I could not resist. Actually it is kinda perfect since the sun decided to come out today! So here is my winter/spring wreath :)

Ingredients:
  • 6" Wired Ribbon (expensive! ~ $7)
  • Fabric
  • Wreath ($5 at Joann's)
  • Hot Glue
First make a couple cute fabric rosettes. I have a tutorial if you need more instruction. I made one out of the ribbon as well to tie it together.


Then take your giant ribbon and tie a ginormous bow on the top. It is really handy to have wired ribbon because it holds it's shape better and does not wilt. Trim the ends.


Attach the rosettes with hot glue.


To hold up the wreath I made my own hook on the back with some extra ribbon. I glued down each end in an arch so it would hang evenly.


Hang and enjoy!


Friday, January 20, 2012

Lightening Nails


In keeping with my weather theme I made a design with clouds and lightening. Striking! This was inspired by my friend Maya after a delicious feast of stuffed shells last night. Enjoy the tutorial!
Ingredients:
  • Gray, White, and Yellow Nail Polish.
  • A Dotting Tool. I made my own since I did not want to buy one. They are only a couple bucks though.
  • Toothpicks
  • Clear Top Coat

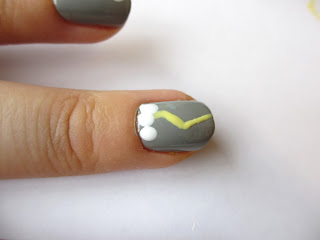
First paint a gray base. Take your dotting tool and make some white dots in a cloud shape. Leave your middle (lightening) finger without clouds for now.


While the dots dry move on to your lightening bolt finger. Use a toothpick and carefully create a lightening bolt on the nail. Go slowly. I practiced on a piece of paper first. I made the middle line first and then pulled the polish down and up for the other lines.


Now add clouds to the lightening bolt.


To create dimension take your dotting tool and dip it in the gray. Dot slightly over the white cloud dots.


Now do the white dots again.


Don't forget your clear top coat!


Thursday, January 19, 2012

Cloudy with a Hint of Sun ~ Nails


Gray and light yellow are my new favorite colors! I absolutely love the duo together. Since I have been drawn to the weather I thought I would do another post about it. Gray skies with a hit of sun :)
Ingredients:

  • Gray and Light Yellow Nail Polish
  • Clear Top Coat
  • Toothpicks
First a gray bottom coat.


It would have been much easier if I had a yellow stripe brush, but alas, I do not own one. So I used toothpicks to make the sun rays.

 
I even overlapped a couple rays onto the next finger. Next create the body of the sun.


Pretty awesome. It might be better to do the sun on a different finger, but I like putting the big designs on the thumb. Enjoy!

Tuesday, January 17, 2012

Rainy Day Nails


The gloom of winter has finally caught up with me. It is raining, snowing, and windy here. The darkness of the days makes me a bit more gloomy than usual. So, in keeping with the mood of the weather, I painted my nails to look like the rainy day outside.

I like how messy you can be with this design. Don't worry about smudges or drops that are different sizes.

Ingredients:
  • Gray, Light Blue, and White nail polish (I used a white art deco bottle with a long skinny brush)
  • Toothpicks
  • Clear Top Coat
First put on a couple coats of gray.


With a toothpick add drops of light blue on the gray.


With the white add streaks of white and small white dots.


Put on a top coat and you're done! You can alter this design to fit your own weather :)

Saturday, January 14, 2012

Brides Against Breast Cancer Charity!


Are you in Portland and getting married (or know someone who is)?! Go to this great event to find a gown of your dreams and help save lives! Jan 20-22.
http://bridesabc-ehometext.eventbrite.com/
"Join us for a unique opportunity to find the gown of your dreams at a remarkable price while helping make wishes and memory-making events come true. 

When you purchase your special dress at a 'Brides Against Breast Cancer™' charity wedding gown sale, you not only save hundreds -- even thousands of dollars -- you will help make a difference in the lives of those affected by breast cancer.

To ensure that no one has to face cancer alone, Brides Against Breast Cancer ™ contributes to programs for cancer patients and their families."

Check it out :)

Wednesday, January 11, 2012

Fabric Button Earrings


I love the idea of using fabric buttons to decorate mundane things. This tutorial is for making fabric button earrings, but you could make fabric button magnets or push pins. I got this idea from this website. After you buy the basic supplies you can make tons of these. I gave a couple pairs out for Christmas and they loved them! 

Ingredients:
  • Button Blanks ~ I found them at my local craft store but you could also find them at Joann's. After you buy the button blank original set you can just buy the refills. They come in several sizes. I like the 5/8 set the best.
  • Fabric ~ I like to buy fat quarters to get just a bit of fabric.
  • Earring Posts
  • Scissors
  • Pliers or wire cutters
  • Hot Glue Gun

Gather supplies. I only had the refill pack but the button blank original set has the white and blue plastic forms. You will want to get that pack to start off. The earring posts you can buy in a couple different size packs.

There are instructions on the back of the pack:


On the back there is a button pattern. Cut it out. This is your fabric pattern. Then cut out a circle in your fabric with the pattern.


Now take the button backs and remove the wire. This is necessary so you can attach the earring back. 


Now follow my pictures to figure out what to do...


Push down {into the hole}


Fold fabric in. Put button back on top and push down with the blue thing.


Push the finished button out of the white thing! 


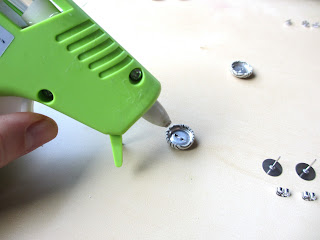
To attach the earring backs use hot glue. 


I made a couple :)