Sunday, October 30, 2011

Felt Bird Wings


My adorable god son is obsessed with birds. 
(Side note: I love how little kids become fascinated by the most random things and then they make it their whole world)
So he decided to be a Ring Necked Pheasant for Halloween ...
Now I just happened to see this Bird Wing Tutorial online but it was not detailed enough for what I was planning. I went to my local fabric store and struggled to find what I wanted to use. The extremely brilliant lady at the desk said "why don't you make the feathers out of felt." Easy and I do not have to finish the edges. I almost kissed her.
Ingredients:
  • Felt - To make these wings I used about 4 sheets of felt per color. It seems like a lot, but do not under guess or you will be running back to the store like I did ... three times.
  • Black Paint for the details
  • Foam Brush
  • Good Fabric Scissors
  • Duck Cloth - For the base. I got a 1 yard.
  • Some sort of ribbon or string for the wings to be held onto the body
  • Child
First measure your child from base of middle finger to base of the other middle finger. This is your arm length. Then measure from the neck to the knee to figure out how long the wings will go.
Then cut a giant half circle out of your duck cloth and cut it in half down the middle. These are your wings!


Now gather supplies and draw your feather template. I just drew one quickly. Mine worked okay, it would have been easier if my template feather was fatter so I did not have to cut out as many feathers.


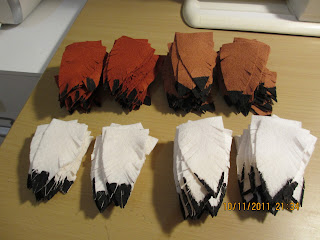
Now start cutting out a ridiculous amount of feathers. I cut out 210 to be exact. You need an even amount because you have two wings and want the same amount on each wing so they match.


 I traced them with pencil and then cut them out with scissors.


This is just an example feather. For the rest of them I added paint to the tips to detail the feathers.


After they dried I snipped the edges.


Then I realized I did not have enough and I ran to the store and bought more felt ...


When I finally thought I had enough I started sewing the feathers on the duck cloth.


And then I ran out of felt again. Damn.
As you can see they are not exact matches, that would be really hard to accomplish. But as long as they look pretty much the same it is fine. The kid is just gonna run around anyway. They are not going to look at it too closely.
 All that is needed now is the ties. I did this in a hurry so I was not able to take pictures but basically you need three ties. Two go on the top corners to tie to the wrists and the third goes in the middle to hold together the wings and tie to the neck.
The hardest part is getting them to stand still long enough to get a good photo.


Turned out pretty good for my first time.

Thursday, October 27, 2011

Flower Nail


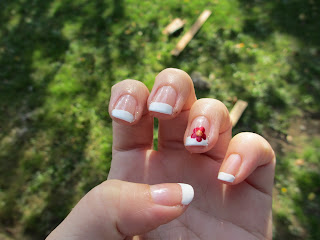
This was surprisingly easy to do since I have a pretty steady hand.
I first did the french tips then I used the end tip of a makeup brush to dot the petals and middle of the flower. 
It did not turn out perfect, but good enough to look cute.


I will do a picture tutorial if you want. Leave me a comment if you need help!

Paint Swatch Earrings


I have a ton of paint swatches laying around and I thought it would be cute to make some of them wearable.

Ingredients:
  • Paint Swatch of your choice
  • Scissors
  • Earring tops
  • Hole Punch
First choose your swatch.

Start to cut them down to a desirable size.


Curve the edges with scissors to make them look like mini swatches.


Hole punch the tops and attach the earring tops.


All done!


The great thing about this design is it comes in every color! Happy crafting :)

Wednesday, October 26, 2011

Feather Earrings


Feathers are so awesome. I bought a bunch for a couple dollars and have been having a lot of fun with them. My first project was feather earrings. I have seen them everywhere recently and I wanted a pair of my own.

Ingredients:
  • Feathers
  • Hot Glue Gun
  • Earring Tops and small metal hoops
 First attach the little hoop to the earring top. This will make a place to attach the feathers to so they face the front.


Then add a dollop of hot glue to the little hoop and start piling on the feathers. You may need to add more glue as you go. Work fast because the glue dries quickly.


Pretty!


I made two pairs ...


I am sure you could add beads or string and go really crazy, but I thought the feathers were so pretty on their own.

Friday, October 21, 2011

I Heart Nails


I was feeling so much love for all my new blog viewers and supporters so I pulled out my nail polish and voila! This is what I came up with. I guess this is better suited for valentines day, but I think hearts are acceptable year round. 

First give yourself white french tips. Refer to my three ways for french tipped nails tutorial if you need to learn how to do this.


On whichever finger you choose, paint a small red heart. I used the round end of a bobby pin to be precise. I started with two dots for the top of the heart and then I pulled down to make the point. Add more polish as you go and fiddle with it until your satisfied.


Thursday, October 20, 2011

Ghost Nails

 
BOO!
Bring a bit of fright with you wherever you go with this easy nail design.


All you need is nail polish and a dotting tool/makeup brush/toothpick.
First make the outline of the ghost on your nail. It should be round and the top and flare out toward the edge of the nail.


Then take whatever tool you choose and dip it into the black. Apply two larger dots at the top for the eyes and one smaller dot below for the mouth.


I chose to french tip the other nails with black, so you can do the same or do something different. Apply a clear top coat to make it shine. Make sure to give you ghost a lot of time to dry before applying the top coat or it will smear.


 The ghost looks mad in this picture...


Try it out and show me pictures!

Tuesday, October 18, 2011

Show Your Support

Do you like my blog? Would you like to show your support in an easy, non-monetary way? I will show you how. On the left side of my blog there are several buttons for your convenience.
The first one is my favorite because it is public support of my blog. The "Followers" button is blue and says "Join this site." When you click it you can choose whether to follow the blog privately or publicly. I prefer public because it is a sign of support. The only thing is you need to have a gmail account to be a follower.


If you do not have a gmail account and do not feel like making one, you can always subscribe. I'm not sure what the limitations are for this one.


Another way to show support is to share my blog with your friends through Facebook or Twitter. I put my new posts on Facebook but I only have so many friends. If you have any friends who you think may be interested in my blog, share it!


If none of these options appeal to you, you can always follow my blog through email. This is a private way to follow and no one will know, not even me.


If you are interested in knowing how many people visit my blog just look at the "Total Pageviews."


The more you click, the higher the number! Showing support is so easy!

Monday, October 17, 2011

Dorothy's Shoes


I have always wanted a pair of sparkly red shoes just like Dorothy in The Wizard of Oz. Unfortunately they are really hard to come by outside of child size 6. Little known fact, however, is in the original story Dorothy has silver shoes. Actually a lot of the story was changed in the film. I guess MGM wanted to make more of a statement. Sorry L. Frank Baum I prefer the red shoes!
To make these shoes you need a few ingredients and a bit of patience.


Ingredients:
  • Shoes - any type will do. I happened to have some awesome pumps that needed some TLC.
  • Red glitter - $5 8oz jar at Michael's
  • Fabric glue or Jewel glue - make sure to get a kind that dries clear.
  • brush
 Brush a liberal amount of glue over the shoe and spread with the brush.


Cover that area with glitter


Make sure to put down newspaper or something because you will make a mess!


You can work in patches or do the whole shoe at once. I used the heel to hold onto as I worked then I covered it afterward. You will notice after one full coat that you can still see the shoe underneath. 


Let it dry for at least a couple hours (or until you can rub it without messing it up) before you add another coat. I added two full coats and I am really happy with the results.


Now I have red, sparkly, glittery, heels! This was really easy and cheap! Because I had shoes and glue already, I only paid for the glitter. Which means I made fabulous shoes (I would price at $40 respectively) for $5. Amazing, 3 clicks and I am home.


It was really hard to take a picture of my own feet!


The only problem is wherever I walk I leave a discreet trail of red glitter. If that is the only problem I have then there's nothing to complain about :) Plus who would'nt want to leave a trail of glitter wherever they go?