Pages

Friday, February 24, 2012

St. Patties Bacon & Eggs


Green Eggs & Ham! Oh Dr. Seuss, you have changed the world. I have seen these all over the place so I knew I had to try this for St. Patrick's Day. What could be better than chocolate and pretzels? Not much. 

Ingredients:
  • Pretzel Sticks - you can also use the square pretzels and have eggs on toast :)
  • M&Ms - green (although you could use any color you want)
  • White Candy Melts - found at Michael's
  • Parchment Paper

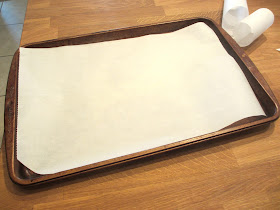
 First line a couple baking sheets with parchment paper. This is not absolutely necessary, but good to use in case the candy melts too much into a gooey mess. Preheat the oven to 350.


Then put down the pretzel sticks in twos.


On each pair put a candy melt.


Put them in the oven for literally a minute. You just want them to melt, but not fall apart. 
When they are melted take them out and place a green M&M on each egg. Press gently or you will squish it!


YUM! These are absolutely addicting!

Tuesday, February 21, 2012

Sequin Headband


This is a very simple headband design with sequins for a splash of sparkle. I would love to make a couple colors and wear them all together!

Ingredients:
  • Strung Sequins 
  • Headband - smallest you can buy
  • Hot Glue
  • Scissors

This is pretty simple. Place the glue down in sections and press the strung sequins down to make sure they are secure.


As for the ends: trim them down and remove the extra sequins. Then glue the ends down by wrapping them under the end.


Then you have a finished, cute headband!


Saturday, February 18, 2012

Happy Banner

 
I have been furiously working on two scrapbooks for the Oregon Humane Society. They are so cute! The layouts are primarily for showing off all the success stories and cute pictures that people have sent back to the shelter. The stories melt my heart!
Coming up with scrapbook layout ideas has been a bit difficult, but taking it one day at a time helps. For one of my layouts I made this cute banner. This turned out to be really easy and you can make it to decorate anything. I have even seen banners on cakes!

Ingredients:
  • Paper (cardstock)
  • Circle punch or some way to cut out perfect circles
  • twine, yarn, or something to hang the circles on
  • glue

I used my Cricut to cut out all the circles, but you can use something else. You could even use scissors if you have the patience! Take your circle and fold it in half.


Put glue on one side and in the crack.


Slip the twine in between the two halves and fold the circle. Hold for a couple seconds to make sure it sticks.


Make a whole strand and decorate anything you can think of. What's cool about this is you can make it really large and use it as a party decoration. Also instead of circles, you could use diamonds to make a banner with flags!

Thursday, February 16, 2012

New Shepard's Pie


Shepard's Pie is one of my favorite recipes ever! It uses up leftovers and is so tasty. I made it a bit differently this time by using cut potatoes instead of mashed. I also used ground turkey instead of beef. I am trying to be healthier ...

Ingredients:
  • 4-5 yukon gold potatoes - sliced thin
  • 1lb ground turkey
  • As many peas as you like
  • 1 big carrot - shredded (this was actually really good!)
  • 1 cup chicken broth - fresh or buillion
  • Roux (flour with water - for thickening)
  • salt and pepper to taste
  • butter

First boil the potatoes until they are done; but don't let them cook until they fall apart.While doing this cook the ground turkey in a pan and drain the extra grease.


Once the meat is done add the chicken broth and heat until simmering. Add a bit of the roux at a time until it becomes the desired thickness. Also add any seasonings you want at this point. Pour all this into the dish. Add peas and shredded carrots. Layer the potatoes on top. Add butter (not required) on top :)

Use a fairly shallow, flat dish so you do not have to layer the potatoes too much. To get a good browning on the potatoes they need to be on the top.


Since everything is cooked you pretty much need a good browning. I cooked it at 375 until it was brown on top. I think it was about 20 minutes. When I cook I guesstimate so please excuse my vagueness.

Yum! It turned out so good!


Wednesday, February 15, 2012

What Do You Think?

I hope the new look has not put you off of my blog! I would love to hear your thoughts regarding the change. I started a poll so you can anonymously tell me what you think. (It is above my picture on the right) However, if you would like to give me more detailed feedback (don't be shy!) leave me a message on my blog! Messages can also be anonymous :)

Also I would love to know what you think about my posts. Readership is down so I want to make sure I am creating crafts/etc that are still desirable. Again if you have any suggestions please do not hesitate to leave me a message.

Without my valuable readers I am really just documenting random crafts to myself :P

Just so you know I have a Pinterest account that you can follow: http://pinterest.com/postgradcrafts/ 

I also created a Twitter recently and I only have a couple friends :( Be my friend? @jessicrafts

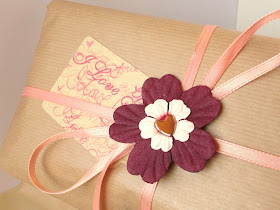
Reusable Present Decoration


Decorating presents is a way you can be really creative, but most of the time (hopefully all) your work is destroyed. Reusing materials can make wrapping presents a breeze and more eco-friendly. Here is my tutorial to make present decoration (of all kinds) reusable:

Ingredients:
  • Paper Clip - matching color is better, but not essential
  • Present Decoration
  • Glue

Pretty much all you do is glue the paperclip to the back of the decoration. You can use hot glue or Elmer's (which takes longer). Make sure to keep the paperclip slightly open so you don't glue it shut. That would make it useless...


Then paperclip your new decoration onto your ribbon. Now when your present is torn mercilessly to shreds you can save the prettiest part!


Tuesday, February 14, 2012

Map Frame

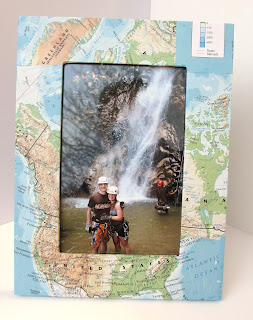
This may not be a stereotypical Valentine's post, but it is still really cool! Maps are so fun to use in crafting because they add a sense of adventure. I especially love this one because I was able to get the whole west coast onto one side. Both my boyfriend and I are from opposite ends and we met in the middle :)

Ingredients:
  • Mod Podge & Brush
  • Map
  • Frame ($3 Target)
  • Screw Driver (to remove hardware)
First take apart the frame. You do not want Mod Podge on glass!


 Then figure out where you want your map to sit on your frame. After you are satisfied with placement, start layering.


For the inner corners cut a line inward and fold the map in. This creates a polished look.


 Don't worry too much about the paper bubbling, it will deflate as it dries. Plus maps are pretty intricate so it won't be obvious.


Don't forget to poke the hardware holes so you know where to attach everything at the end.


After it dries attach the hardware and replace glass. Then put a picture in the frame. I picked one from a trip to Mexico!


My map was not very large so I pieced together a bunch of map parts. If you look closely you can see Greenland above the US and Canada covering NY. But from a distance it looks really great. Maps are so cool!

Sunday, February 12, 2012

My 25 Things

I recently saw a post about another bloggers "25 Things" and thought I should do the same. It's basically a list of random things about a person; likes, dislikes, and random facts. I thought this could be a fun way to get to know me a bit better.

1. I love Flamin' Hot Cheetos. These babies have gotten me through some tough times.

2. I have only dyed my hair twice. The first was self done red streaks (mistake). The second time was using colored shampoo (mistake). I have never dyed it since.

3. I watch Friends (the show) re-runs all the time. I also follow Grey's Anatomy, Cake Boss, Glee, and Face Off.

4. I am obsessed with Country music.

5. I have always thought it would be super cool to have shiny, blue skin. 

6. My favorite color is yellow but it changes pretty often. Past favorites: Red, Purple, Green.

7. I love thrift shopping and finding amazing treasures.

8. I am severely afraid of becoming a hoarder. I actually get anxious when I have too much stuff.

9. I will eat pretty much anything ... except Uni.

10. I am not a big fan of puppies. They are cute until they use you as a chew toy. 

11. I adore cats/kittens. I foster any time I can. My first foster kittens were adopted by my mom because I could not bear to part with them. 

12. I have a moderate case of road rage although I am a very cautious driver. I yell at people in my car when they are being stupid drivers. 

13. I would much prefer to have an intimate gathering of friends than go to a raging party. I actually usually get really bored at big parties.

14. I have a very small head and feet. I can shop in the children's section.

15. I am always cold.

16. I believe family is the most important thing, even if you don't like them. (not directed at anyone)

17. I studied abroad in Australia for 5 months and I want to go back as soon as possible.

18. There is no reason anyone should be limited to one best friend. I have several: Keely, Bonnie, Maya, Bri, and my Mom.

19. I binge read books. I especially love mystery/romance novels.

20. More often than not I have mismatched socks. Also they most often have holes (not because I cannot afford new socks, I just wear them out at an astonishing rate).

22. I have always been jealous of people who have freckles. 

23. I may be small, but I am pretty spunky. I am not afraid to tell people what I think.

24. My favorite flowers are white calla lilies and poppies. However, I think receiving flowers is embarrassing.

25. I am pretty sure I have met the man I want to spend the rest of my life with : )

Friday, February 10, 2012

Butterfly Card


I am going to a craft fair in March which includes a Card Swap so I have been working on my card making skills. This card was inspired by a conversation with a recruiter yesterday that went pretty well. I am sending her this card as a thanks. The butterfly stamps I bought a couple months ago and forgot about them. This card turned out so cute and I am really happy with it. I hope you love it too!

To make this card you need a bunch of tools, but it was pretty simple. The butterfly is embossed with silver sparkle powder over white ink. Each wavy stripe on the card was cut out with wavy scissors and then glued on top of each other. The ribbon was attached on top. The last detail was the pearl on top. I absolutely *love* pearls.


Tuesday, February 7, 2012

Snapshots ~ Deborah Hamouris


My grandma is a very talented artist and is creating an album of music. 90% of the music is her own creation and they are "snapshots" of her life. The music is a blend of jazz, blues, and folk music. She is currently seeking backers so she can finish this album. 


To get a better idea of her creative process watch her movie:


Help out an independent artist and you will receive gifts in return! For example, she is knitting kitty hats for people who donate $60. To donate go to:

Kickstarter Campaign

Anything counts!

Monday, February 6, 2012

No Sew Bow


This is a very simple bow tutorial. There is no sewing involved and just a bit of glue. The great thing about this is that you can make one on the fly and if you don't like it, you can take it apart and make a different one. Any fabric will work so you can be really creative!


Ingredients:
  • Fabric
  • Hair Clip
  • Hot Glue (optional)
  • Scissors
 First cut out a piece of fabric. This will be the body of your bow. Longer and thinner pieces will be long and thin bows. Short and fat pieces will be short fat bows. You get it.


Turn the piece over and fold the two sides inward and have them overlap about an inch.


Now pinch it in the middle three times so it looks like this:


Now trim a piece of fabric that is long and skinny. This will be the middle of the bow.


Carefully tie the long strip around the middle of your bow. make sure the knot is in the back.


Tighten and adjust til you like it. at this point you can either tie on the hair clip or glue it. Either way works. Then you can either cut the ends off or keep them.


Easy as pie!